Monday, May 30, 2011

Let's Draw a Pear! - Step 5

This post continues with the tutorial, Let's Draw a Pear! If you are following along with the steps of this drawing, please don't forget to put a link in the comments. I would love to see your pear drawings!

Step Five : Applying colored pencil in layers to create form and depth of color 
 A.  First color layer
First, lighten the pencil outlines by dabbing with a kneaded eraser. Using light pencil pressure, fill in the entire pear shape with Light Chrome Yellow, leaving the white highlight areas the white of the paper surface.   

Because our reference photo shows the pear with all-over yellow cast to the color, you will begin with an even layer of yellow over the entire shape of the pear. With each layer of color, use uniformly light pressure when applying the colored pencil to the paper.  I often will turn my paper in several directions when coloring in, to vary the direction of pencil strokes giving a more uniform quality to the layer of color. 

  
B. Second color layer
Now you will begin to look for variations of color within the pear shape and on the stem.  Observing where these variations form general shapes of color, begin with Light Yellow Ochre to block in those places of darker, warmer yellow on the pear.  Add Light Green to those areas with a greenish tint. Add Cadmium Yellow and Cadmium Yellow Lemon to the brighter yellow areas on the front and light side of the pear.  On the stem, use Light Yellow Ochre, Brown Ochre, Sanguine, and Light Green to block in those color shapes.

Remember to keep a light pressure when applying your colored pencil to the paper.  Rotate the paper’s position to keep changing the pencil’s stroke direction.

  
C. Third color layer
Fill in the area of red-orange with Light Cadmium Red. Use Cadmium Orange to feather the edges of the red.

Next use Burnt Carmine to deepen the darker red areas out to the right shadowed edge. This will darken and neutralize the yellow-green on the shadowed edge of the pear.


Now add a couple of touches of Burnt Carmine to the darker edges of the stem.

*If you would like to work from a paper copy of the tutorial you can visit my Tutorial page here on this blog and follow the links to a free PDF file that you may download for yourself.

Wednesday's post will continue with step five, adding shadows with colored pencil layers.

Friday, May 27, 2011

Let's Draw a Pear! - Steps 3 & 4

Today's post continues with our pear tutorial begun in the last post. Click here in case you missed steps 1 & 2. Or go to my Tutorial page and follow the links to download a copy of the entire tutorial, Let's Draw a Pear!, in PDF.

Step Three : A list of materials used to make this drawing

Here are the supplies that I used to make this drawing of a pear. For my support (paper or other surface for applying art media) I used my favorite Rising Museum Board. It has a slight texture and a somewhat firm surface. This allows for lots of layering of the colored pencil. Another good support for colored pencil work is Strathmore Bristol Vellum 500 Series. It has similar characteristics to Rising Museum Board and provides a very suitable surface for colored pencil.


The other items I used were tracing paper, artist’s tape, a mechanical pencil, pencil sharpeners, kneaded erasers, and a white plastic eraser stick.


The colored pencils that I used for this pear drawing were all Faber-Castell Polychromos colored pencils. I used the following colors (in this order):


Light Chrome Yellow, Light Yellow Ochre, Brown Ochre, Sanguine, Light Green, Cadmium Yellow, Cadmium Yellow Lemon, Light Cadmium Red, Cadmium Orange, Burnt Carmine, Burnt Umber, and Dark Indigo.

Faber-Castell Polychromos colored pencils are often available as open stock from art supply retailers.

Step Four : Transferring the image to the drawing surface
Mark your drawing support for a 5 x 7 inch format.  Place tracing paper over the photo reference and mark the corners. Trace the outline of the pear shape and shadow with pencil. Other than the pear’s shadow, we are not concerned with any of the background. If it is too difficult to see the shadowed edge of the pear against the dark back ground through the tracing paper, draw that edge with a white colored pencil directly on the printed out photo reference.

Turn the tracing to the back side and draw along the pear shape with a soft lead pencil.

Now place the tracing right side up over your marked drawing surface, lining up corners and tape the tracing paper to the drawing paper at the top.

Draw over the pear shape outline with a pencil, careful not to press down too hard. Using a heavy pressure will impress lines into your support. Now the outline of your pear shape should be transferred onto the drawing support.

Monday's post will show the first stages of the colored pencil layering techniques in Step 5. Hope to see you there!

Thursday, May 26, 2011

Let's Draw a Pear!

Pear
colored pencil on Rising Museum Board
5 x 7 inches
©Ann Thompson Nemcosky

I am trying something new on my blog. I have put together a tutorial for doing a colored pencil drawing of a pear and will be posting the steps throughout the next week. I invite you all to not only follow along, but if you would like to give the drawing a try yourself, please let me know in the comments with a link to where you are posting your results. I would love to follow along with your progress too!

Also, if you would prefer to work from a paper copy of the tutorial you can visit my Tutorial page here on this blog and follow the links to a free PDF file that you may download for yourself.

Today I will begin with the Introduction and steps 1 and 2, just to get you started. Have fun!
___________________


 There are as many different ways to draw with colored pencil as there are colored pencil artists. Drawing still life objects is always a popular subject and one which lends itself well to the medium of colored pencil.

In this tutorial you will see the process that I follow for drawing a still life subject in colored pencil, from setting up and photographing the subject to the finished drawing.

The steps outlined here for drawing this pear are
  •   Taking a good photo reference of the pear 
  •   Adjusting the photo and creating the composition in Photoshop
  •  A list of materials used to make this drawing
  • Transferring the image to the drawing surface
  • Applying colored pencil in layers to create form and depth of color
  • Using a kneaded eraser as a drawing tool to create texture
  • Putting the final touches on the drawing
Step One : Taking a good photo reference of the pear
Here is my usual set up for photographing still life objects. I use indirect, natural light coming in through our back door with a white painting board balanced on top of a small pedestal table. I place my still life object on the white board and photograph from many angles with the object(s) in various positions. I never use a flash for these photos as a flash will wash out the light and shadow. 

I have used black denim fabric when I want a dark background for my object but my preferred surface is this white laminate board. It reflects a bit of light and nicely catches the shadows from the objects.

Though I do have to be careful that my “assistant” doesn’t confuse my still life set up for his snack!

Step Two :  Adjusting the photo and creating the composition in Photoshop
This is how the photo I chose to use for my reference appeared straight out of the camera. I liked the position of the singular pear including the turn of the stem. I also saw that it had a good value range from light to dark, a nice distribution of color and interesting highlights and shadow.
 
Next,  I made my adjustments to the photo in Photoshop. First I cropped the photo to my desired 5 x 7 inch size, centering the pear within the format. I then used the auto levels and auto color functions.  I increased the saturation by 15, the brightness by 30, and the contrast by 15. I applied the unsharp mask with a setting of 50%, radius 1.0 and threshold 0. 

I printed out a copy to check the result. Because pictures always seem to print a little dark on my printer,  I went back and increased the brightness setting by 12 and printed out my reference again.  If all of these settings and numbers are unfamiliar or confusing, don’t worry. Basically, I cropped the image to its desired size, adjusted for contrast, increased the brightness and color saturation, and sharpened the image. All of that took my okay picture and created a very acceptable reference photo.

Below is the final reference photograph ready for you to print out and use for your drawing of the pear.
 Click on the photo to open a larger size. Hopefully it will print as a 5 x 7 inch photo for you!

Friday I will post steps 3 and 4. Stay tuned!

Wednesday, May 25, 2011

Sketchbook Tuesday - It's Wednesday, I know

I was all set to post yesterday only to find that a glitch with blogger was preventing me from signing in. So my planned posts for this week are a little backed up, but there it is.

We spent last week at Edisto Island, SC, our favorite get-away. The weather couldn't have been more perfect. We had fun playing on the beach, wonderful meals, and the company of a good friend. And we all enjoyed spending some time with our art. Above is a sketch of a few found shells, in my handmade sketch journal.
The screened porch was my favorite sketching spot at our little rental cottage. Every morning we were visited by a pair of bluebirds that would sit happily singing on the utility wire that ran in front of the cottage, in perfect view of the screened porch. I imagined that was a good omen for our stay.
 We spent one afternoon on the sound side of the island with our watercolor gear. I took my small watercolor kit and a few watercolor postcards instead of my sketch book. It was a good thing too. The wind was very strong, blowing sand onto everything, sticking in the paint and on the paper. I did this quick little sketch with an indigo colored pencil filled in with a watercolor wash.
 And I couldn't leave Edisto without sketching a palm tree. Along with the huge live oaks decorated with Spanish moss, the palmettos are a part of the charm that is Edisto.

Tuesday, May 17, 2011

Sketchbook Tuesday - Down by the river

We managed to get out for another sketch outing last week, this time to the park in Valle Crucis. It was nice sitting in the sunshine by the river but the bees were out. I did this quick sketch in my handmade sketch journal, while warding off curious bees.

Friday, May 13, 2011

It takes practice


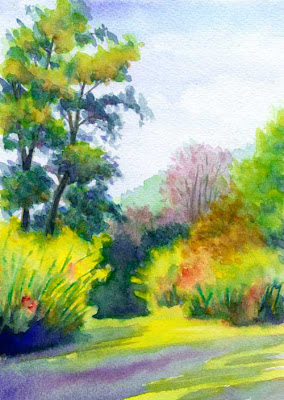
Daniel Boone Gardens in Summer
watercolor on 140lb. Kilimanjaro cold-pressed
6 x 8.5 inches
©Ann Thompson Nemcosky

One project that I am currently working on is watercolor practice. Lately, the only time I use watercolors is for sketches in my sketch journal. I would like to continue to improve with watercolor, so I picked up a nice watercolor block and a couple of new brushes and have begun a regular (sort of) practice. The image above is the result of a practice session. It felt good to be working on nice watercolor paper and in a size larger than my usual journal format. If this scene looks familiar to you, it's because I have also used it for a colored pencil piece, here.

LinkWithin

Blog Widget by LinkWithin