Thursday, July 17, 2008

Bugs!

ACEO Ladybug
3.5 x 2.5 inches
colored pencil on paper
©2008 by Ann Thompson Nemcosky
sold

ACEO Moth
3.5 x 2.5 inches
colored pencil on paper
©2008 by Ann Thompson Nemcosky
sold

So what's buggin' me? Lately I've been in a funk with my art. Things aren't coming along quite the way I'd like. Maybe it's because of summer. Or that my time for art has been chopped up due to lots of other work coming in. Or that there is so much neglected stuff around the house that keeps calling for my attention. Whatever the reason I haven't had much to post recently simply because I don't have much art happening and what art I have attempted to do I haven't wanted to post. Big whine. It will get better.

Anyway, about a month ago I drew this little ladybug. It seemed lonely, so last night I drew the moth to keep it company. It has been a while since I posted any art cards. They are very relaxing to make and at least I can feel like I have accomplished something. But don't worry, no insects were harmed in the making of these drawings.

Saturday, July 12, 2008

Onions and things


Here I am still playing with watercolors. This one is for Everyday Matters drawing challenge #179, Draw an onion. It is in my small hand.book journal.

And while I was doing that, Laurel Neustadter of An Artist's Journey gave me this award. Thank you Laurel! The rules of accepting are as follows:
  1. Put the logo on your blog.
  2. Add a link to the person who awarded you.
  3. Nominate at least 7 other blogs.
  4. Add links to those blogs on yours.
  5. Leave a message for your nominees on their blogs.
These are a fun way to share links to blogs. I enjoy reading through many artists' blogs for there is always inspiration to be found and encouragement to be shared. But to choose only seven to pass along the award to is tough. Here is my list of seven, out of the many wonderful blogs I enjoy.
1. Cindy - Color On!
2. Christie - from the Labyrinth
3. Margaret - MaggieArt
4. Linda - Quotidian Curiosities
5. Kathleen - My Creative Spot Blog
6. Rachel - The Jacobite Rose
7. Barbara - One Happy Fool

And here is what became of the onion that I drew in watercolor. I purchased some lovely summer squash and juicy red tomatoes at the local farmers' market this morning. When I didn't find a recipe for the squash to suit my mood today, I created one myself. It turned out pretty well, and we enjoyed it with our grilled fish this evening. So here is what I did:
I beat two eggs with about 1/2 cup sour cream, some pepper, oregano, and thyme. Then I added around 1/2 cup of grated cheddar, 1/2 cup breadcrumbs, 1/2 cup or so of finely chopped onion, two squash very thinly sliced and mixed that all together. (Now my measurements aren't exact because I was making this up as I went along, and not bothering to measure what I put in.) Then I sprayed my small casserole dish with cooking spray and placed a layer of thin tomato slices on the bottom, added the squash mixture, and another layer of tomatoes on top. I sprinkled more cheddar cheese on top and baked uncovered at 375 for about 40 minutes. Sorry for the poor photo, (bad lighting) and it was prettier in real life! It turned out to be the perfect summery dish and a great way to enjoy our market fresh squash. Enjoy!

Monday, July 7, 2008

Pastel Monday

Gardens at Manteo
pastel on sanded pastel paper
4.5 x 6.5 inches
©2008 Ann Thompson Nemcosky
click here to buy

This is a scene from the Elizabethan Gardens in Manteo, North Carolina. What a lovely place that is. Walkways that meander on forever with something new at every turn. The day we toured there started out cloudy but soon enough the sun broke through casting all sorts of wonderful light and shadow patterns. I liked this view where through the dappled sunlight a bright spot appeared just as the path made a turn toward something new.

Saturday, July 5, 2008

Something Red

It has been a while since I posted drawing challenges from the Everyday Matters group. And that's because I've been busy with other work and took a vacation and ahem ahem, you know, other stuff. Excuses, I know. But today I got out my hand.book journal and the watercolors and just had fun working on some of the drawing challenges I have missed lately. The challenge this week, #178, was to draw something red. These strawberries are from today's trip to the grocery - they were on special.
This is for challenge #174, Draw a basket and what it holds. This is a sea grass basket that hubby and I bought at Edisto Island, South Carolina, at least 15 years ago. At the time it seemed expensive for just a basket, even though hand made locally, but I knew then that this was an art form with a rich history. Sea grass baskets this size now sell for at least three times as much. This basket holds a wealth of good memories.
Here is my challenge #174, Draw a bridge. This is the Linn Cove Viaduct on the Blue Ridge Parkway that snakes around Grandfather Mountain. We are not too far from this bridge, a local landmark. This is the only challenge that I have done from a photograph as my goal with these is to improve my skills drawing from life. But I am also trying to learn to use watercolor for sketching. I am currently going through the tutorials in Cathy Johnson's book, First Steps Series, Painting Watercolors. I have a way to go but still thought it would be fun to try some EDM challenges in watercolor as further practice.
And lastly, here is challenge #5, Draw your bed. For this I used a black gel pen and Pitt brush pens. I'd like to try more sketches this way. It was an immediate way to respond to the drawing. And yes, I rarely make my bed. It has a duvet cover so really it's just a matter of straightening it out but I hardly ever do that. And that is my little stuffed dog on the pillow. Kiddo gave him to me a few years back and he's slept on the bed there ever since.

Tuesday, July 1, 2008

Color lessons

Detail from Bass Lake Trail
colored pencil on pastel board


First, let me begin by apologizing for not having a pastel post yesterday. I did do a pastel drawing but haven't finished it, so next Monday I will hopefully resume with my Pastel Monday posts.

What I do have to post today is a small colored pencil piece that I have been working on, and all its stages of process. I have been concentrating on color these days, or more specifically, my use of color, and have learned a few things about myself and my working habits along the way. Not to bore you with all the details of my color study I will just say that using color, and especially using color expressively, is a constant challenge. A challenge that keeps me interested and moving on to the next thing but is always a learning process. I have a tendency to over work color through a struggle of pushing and pulling layers of color throughout the making of a piece, often losing that fresh, expressive quality I was after in the first place. I do this no matter what media I am working in, colored pencil, pastel, acrylic, watercolor, any color media I pick up is fair game. So my challenge is to overcome this habit and try to be much more focused in my intent. And posted here is one recent attempt to hold on to that focus plus do a little experimenting with color.
This first image shows my 6 x 6 inch pastel board drawn with Derwent's Inktense watercolor pencils. I was looking for patterns of light and dark, warm and cool, in this little landscape scene.


Next, I washed the Inktense pencil with water. The colors become much more saturated.


When the board was dry I started in with Derwent's Coloursoft colored pencil. Again looking for patterns of light and dark, warm and cool.


Here I am much further along with the dry colored pencil. I tend to work from the top left outward, getting to about 80% completion, and often bouncing back and forth from the area I am expanding back into previous areas to make adjustments and outward across the board some more.


Bass Lake Trail
colored pencil on pastel board
6 x 6 inches
©2008 by Ann Thompson Nemcosky


Lastly, here is the completed piece. I did manage to keep my focus for the most part and was happy with the overall process on this one. I have previously done colored pencil works using this technique but with a lot more pushing and pulling of color back and forth. I still have a way to go before I can really say that I was able to stay focused on my intent throughout. And I know there are always those times when you have to let the work dictate what it needs. In this piece I like the effect those bright colors of the underpainting have on the colored pencil applied over top. In the future I would like to push this use of color even further and have the underpainting play a more important role in the finished work. It's really all about the process.

Friday, June 27, 2008

Nature Studies


A collection. I realized I hadn't yet posted these sketches. I'm still very busy right now with other work although I am managing to work on a new colored pencil piece as well. I'm just not ready to show it yet so you will have to wait a little while longer. These are all in my small Winsor Newton sketchbook, the one on top is done with walnut brown Polychromo colored pencil, the other two are in graphite. I don't know why I keep getting that pink band along the center, that's just something that seems to happen when I lay this book flat to scan and I haven't figured out how to make it go away.

Lately I have been feeling a lot like the quote from Annie Dillard about sticking a net into time and saying 'now'. These summer days up here in our mountains have been stunningly beautiful. The flowers in our yard are blooming, the vegetable garden is growing, and the dogs and Kiddo are enjoying lots of time outdoors. Kiddo, at 9, is at that age where despite her growing independence she still needs her mom about. And I don't want to miss any of that as I already know how fast things like that can change as kids grow older. But I have lots of ideas to keep me going with my art work and Hubby is enjoying the last of his summer break before he heads back to the classroom for summer courses. Sometimes these long days of summer just aren't long enough.

Monday, June 23, 2008

Pastel Monday

Marsh Trees
pastel on sanded pastel paper
4.5 x 6.5 inches
©Ann Thompson Nemcosky
Click here to buy


Things are still keeping me busy here so I pulled an image from our trip to Edisto Island last spring as inspiration for this pastel drawing. The salt marshes there are lovely and mysterious. I like the textures and colors of the grasses, and the gnarled, weathered trees, all against that still blue water. Little spots like this that look like nothing is going on are probably actually teeming with life just below the surface.

Thursday, June 19, 2008

Paying Attention

graphite in small Winsor Newton sketchbook
quote by Annie Dillard from Pilgrim At Tinker Creek


I've been busy lately but not with art work. Some free-lance design work that I actually get paid for and then the other stuff of life thrown in just to keep me on my toes has been occupying almost all of my time lately. So I decided I'd post this little drawing I did in my nature journal while on my beach vacation last month.

Although getting away and having a break from the usual routine is refreshing, I find I am growing impatient to get back to my art work. We've been taking care of projects around the house, and the free-lance work is good for my pocket book, but I've had a sense of not being in balance. I believe it is coming from missing the time I would be spending drawing, because when I am drawing I am really focusing on something. It's a sustained attention that helps me stay balanced for all the other hectic times throughout the day. And until now I didn't realize how important that routine of drawing was to maintaining my sense of balance.

My calendar tells me that tomorrow is the summer solstice. The days will no longer expand, but begin to grow ever so slightly shorter. A time of turning inward. I am ready. I need to remind myself to pay attention more.


Monday, June 16, 2008

Pastel Monday

Greenway Creek
pastel on sanded paper
6.5 x 4.5 inches
©2008 by Ann Thompson Nemcosky
Click here to buy

This is a scene of the creek along our town's Greenway Trail. The Greenway Trail is a couple of miles long and runs through our town. I don't know the name of the creek, but it's probably actually called a river. Most are around here. We are at the Eastern Continental Divide, where the rivers start. I grew up in Cincinnati. The Ohio, now that's a river. What we have around here will always be just creeks to me.

Wednesday, June 11, 2008

Color!


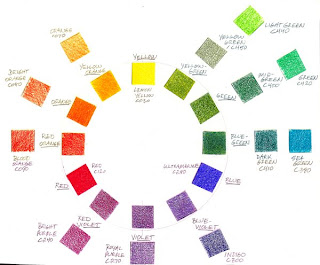
While working with the study of color this month I thought it was time I created a color wheel with colored pencil. Now I have made color wheels with paint, but colored pencil is really an entirely different exercise. Because of the translucency of colored pencil it is perhaps a much more difficult exercise, yet very worthwhile for learning not only how colored pencil "mixes" color but also for understanding just what color palette is available with colored pencils. I am doing this project in tandem with Rose Welty of Rose's Art Lines and you can see her color wheel "mixing" results here.

So up top you see my colored pencil color wheel. For the purpose of this exercise I used Derwent's Coloursoft colored pencils primarily because this is the only brand where I own the complete set. My thinking being that with a complete set I should have all the colors necessary to do this type project. Well, not exactly, as I learned.

First off, I identified three pencils to use as my primaries of red, yellow and blue. For red, I used Red c120; yellow, Lemon Yellow co30; and blue, Ultramarine c290. I then proceeded to mix my secondary and tertiary colors using just those three primaries. The complete circle of colors in my color wheel shows the results of these mixes. Although mixing a good violet in any color media is difficult, in this case the red and blue worked quite well. Green turned out to be a more difficult color to achieve, probably because my blue primary leans a little toward the red, resulting in a green with somewhat less intensity. For the sake of comparison I included examples of 'pre-mixed' colored pencils that most closely match the secondary and tertiary colors in my color wheel. By clicking on the color wheel you should be able to see it large enough to read my notations identifying each color used. The oranges were easy enough as were the violet and red-violet to find matches to my 'mixed' colors. The green hues were where I found the Coloursofts very lacking. Nothing is really a good yellow-green, green or blue-green. In each case it seemed a mixture of my two closest contenders would result in better representations of those colors. And a true blue-violet was not to be found, as you can see, my Indigo pencil was the closest, and it is really a different hue entirely.

As a side note, I used at least three different color wheel sources to help me find the correct hues for my color wheel. And even within these three sources there were variations of hue from one color wheel to the next. Color is, after all, very subjective depending on the viewer, the media, and the printing or whatever process is used to reproduce it.

Next up in this exercise is my value scale. Now value, is the relative lightness or darkness of a hue. The lighter values being 'tints', and the darker values are 'shades'. Here I used my blue hue, identified the location of the blue on the value scale, with white at one end and black at the other. I then 'mixed, with either white or black to get my range or seven values. Notice that the blue hue does not fall in the center of the value range, but just right of center toward the darker shades. Where do you think red would be on a value scale? Yellow? Each hue also has its own relative value.

And lastly, my intensity scale. Intensity refers to the relative saturation of a color. To remove or lessen a hue's intensity you can introduce the complement of that hue. In this case I used the complements of blue and orange. And I used the orange colored pencil as opposed to my mixed orange, just to make things simpler and more consistent. The center square is the neutral achieved by mixing the two complements. Changing a color's value with white, black, or gray will also lessen it's intensity. Personally I never use my black colored pencils. I find pure black to be rather deadening in a colored pencil drawing, a holdover from my painting days. Instead I prefer to 'mix' darks, so that even though it may be very dark, there remains some hint of color in my darkest values in a colored pencil drawing.

When I mention 'mixing' color with colored pencils I don't mean mixing in the same way one would mix color in paint. As I stated above, colored pencils apply pigment in a translucent manner that produces a different set of challenges from mixing an opaque media like paint. When layering with colored pencils, it is possible to see the color from the previous layer peeking through as each new layer of color is applied. What is really happening is an optical mixing of color. Your eye blends all those little bits of color into a new color just like all the little dots of color in a newspaper photo blend into the colors you see. Optical mixing of color is challenging but also offers a lot of exciting possibilities for ways to use color, as the Post Impressionist painters discovered. And Chuck Close used so well.

For further reading about color, how we see colors, and a very thorough explanation of the color terms, hue, value and intensity, check out Katherine Tyrrell's recent post "Colour-a scientific perspective" on her blog, Making a Mark.

LinkWithin

Blog Widget by LinkWithin